Tuesday, October 30, 2012

SourDough Crepes with bacon, goat cheese, apples, shallots, and pea tendrils


     Often times known as a french breakfast dish but a great deal of european cultures have their own variation on the theme and not always breakfasty and not always savory. Poland has their blintz, Russia has their blini, Hungry has their palascinta, etc. They are all slightly different variations on a very thin pancake wrapped up with some sort of surprise inside. 
     My girlfriend has her own bread sourdough starters adding to the fermenting vats around the house. This recipe uses those starters to create a sour slightly airy crepe dough. If you dont have starters going in your house they are a good healthy alternative to store bought bread yeast (see fermented steak sauce post). The premise is that you mix water with whole grain bread flour to form a watery paste-like consistency and leave it out for days on end, feeding it each day with more flour until the wild yeast start to develop enough to make the dough rise and aerate. This takes about a week to get it going but once you have a healthy culture living in your dough you can keep it in the fridge and feed it once a week and take it out to use it as needed. Grant it this is a difficult process to master and take a lot of trial and error, so for those who dont have starters laying around, I included an alternative crepe recipe taken from JOY of cooking, probably the best book for a beginner cook to read. 


For the crepe batter
   3/4 cup sourdough starter
   2 eggs
   2 T melted butter
   whole milk to consistency (about 1/4 cup)
   salt and pepper to taste
   1 tsp sugar
Mix ingredients together to form a batter. Melt some butter in a skillet over medium heat and ladle about 3 oz of batter in the pan and tilt it immediately so it evenly covers the bottom of the pan. Cook about 2 minutes until it firms up enough to flip with a spatula. Upon flipping add your cheese and other ingredients. After another 1-2 minutes fold/roll up the crepe and remove to a plate to let cool a bit and then devour. 

Alternate crepe recipe
   1 cup all purpose flour or spelt flour
   1 cup whole milk
   1/2 cup lukewarm water
   4 eggs
   1/4 cup melted butter
   1/2 tsp salt
   1/2 tsp sugar 
Mix ingredients, cover and let stand for 30 min before cooking. Follow same instructions as above. 


  For the filling
   thinly sliced sauteed shallots
   thinly sliced apples (I used the Golden Russet variety)
   cooked bacon strips (see Boogs Bacon post on how to make your own)
   pea tendrils
   goat cheese crumbled (I used aged gouda)


Pea tendrils are the shoots of the pea plant - they are tender, crunchy and delicious. Have fun with the fillings and be creative, crepes are a great template for building a meal out of stray veggies and a little cheese and whatnots you have laying around in the fridge.

Boog's Bacon

      Making your own bacon at home is one of the most useful, gratifying, sensible things you can do as a home cook. It is very easy and with a bit of preparation and planning ahead you can have delicious bacon stocked up for months. I encourage you to source a belly from a free range organic pig preferably wild foraging on nuts and roots. This results is a meat with much more flavor. Animals to a degree will taste like what they are eating. If you want pork with a nutty, rich, earthy flavor you'll take the time to source a quality hog. Feed a pig garlic and chestnuts and the flesh will reflect those flavors. The best place to source a large primal cut of meat as well as a quality one is of course your local farmers market. Most regular grocery stores dont offer quality meats, most organic ones dont offer large cuts, if they offer any meat at all. Butcher shops are a dying breed unfortunately and the ones that are left are of suspect integrity.
      I special ordered a whole belly a week in advance from Many Rocks Farm, a purveyor at the Baltimore Farmers Market, offering the Mulefoot breed of pig. The flavor was rich, and almost gamey from the wild diet they were raised on; one of the most flavorful breeds of pig I've tasted. Regardless of where you source your pork from, the factory farmed pig (offered at most "regular" grocery stores) is going to fall far flat in terms of flavor, fat content, and health benefits. If this is absolutely the only thing you can find and afford, homemade bacon is still worth the effort. My reasoning for spending the extra dough is that I want to know exactly what is going into my body - healthy animals means healthy meat which means healthy me. If you look at the ingredients list of a pre-made product and you dont recognize or cant pronounce the ingredients on the list, I would think twice about eating it. At the same time, if you shop for the cheapest version of any product, you have to stop and think "why is this the cheapest" - in most cases its because its the shittiest version or the quality is at least compromised in some way. Im not saying to buy the most expensive version of everything but to be aware of whats going into your body because what goes in, is going to manifest itself in some way or another.
      The beauty of making your own is obviously that you can hone the seasoning and salt content it to your own taste buds but furthermore that you can smoke it with whatever wood, guarantee freshness, leave out the nitrates and nitrites, and slice it however thick or thin you want (or even leave some as slab bacon). Like I mentioned in an earlier post, farmers markets are a great place to source any of your food because you can stand there and ask the farmer (or someone that is at least somehow involved in the process) all about the product in consideration (for meat for example: what was the diet of the animal, what is the breed, is it free range, is it organic, age at slaughter, how long was it hung) and perhaps make a special request for a primal cut.
 Now that you have your whole or half pork belly (they can range anywhere from 10-15 lbs so half might be a better start), its time to make your dry cure. Get creative and add what you want - you could make a sweeter breakfast bacon, an herbal savory bacon, or a simple pepper bacon. My recipe combines them all and works well for pretty much anything I use bacon for.

The Dry Cure
   8-10 lbs pork belly
   1/3 cup maple syrup
   140 grams salt (preferably sea salt) or a scant half cup if you dont have a scale
   1/4 cup sucanat or brown sugar
   2 T crushed bay leaves
   1 T toasted coriander seeds
   2 T course freshly ground pepper
   2 T juniper berries
   2 tsp allspice berries
   1 tsp cloves
   6 garlic cloves pressed through a garlic press or grated
   6-8 sprigs of fresh thyme
Rub the belly with the maple syrup. Mix the rest of the ingredients in a bowl and rub all over the top, bottom, and sides of the belly. Place on a half sheet tray or a nonreactive container large enough to fit the belly. Cover with plastic wrap, press with a weight on top and store in the fridge for 5-7 days depending on the thickness of the belly (most are 1-2 inches thick; the thicker the longer it takes to cure).


After the cure time, wash the belly thoroughly and place on a wrack and back in the fridge uncovered for another day or two to form a pellicle (dry shiny surface that smoke will adhere to). After a minimum of 12 hrs it is ready to smoke. Make sure to soak your chips/wood for at least an hr before smoking. I used applewood chips and chestnut shells that I had left over from making chestnut soup but pretty much any type of wood chips or nut shells will do the trick. Hickory I actually tend to stay away from because of their overpowering almost astringent flavor. Fire your grill up for indirect heat at 300-325 degrees. Once the grill is heated and at a steady temp add the chips and the belly. Cover as much as you can  in order to hold in the smoke and maintain the temp. Smoke for 2-4 hrs or until internal temp reaches 150 F.
 There you have it, your bacon is ready to slice once its cooled. Leaving some of the bacon as slab bacon allows you to cut it into chunks for soups and stews, strips for salads and sauces. The slices I cook on a rack rubbed with a bit of sucanat and freshly cracked pepper in a 375 F oven.
This helps off set the saltiness of the bacon and yields a nice crispy caramelized surface. Happy smokey bacon adventures. 

Saturday, October 27, 2012

Parsnip and apple soup

Ahh the pureed soup, creamy texture without even needing to add cream, even distribution and marriage of flavors, easy to eat and add other accompaniments. Better yet you dont have to worry about your knife work! Ahh the parsnip, looks like a white carrot but so very different - buttery, sweet, and slight touch of spice. 

This soup is very easy to put together and has some nice fall flavors come together.


The Recipe
   4 parsnips peeled and chopped
   1 carrot peeled and chopped
   1 leek washed thoroughly and chopped
   2 shallots chopped
   2 apples preferably of different varieties (I used Braeburn and Jonagold)
   2 stalks celery
   6 cups chicken stock
   6 sprigs of thyme
   2 bay leaves
   1 cup of cream preferably raw and organic
   2 T olive oil
   1/2 cup white wine (I used Riesling)
   salt and white pepper to taste

Heat the oil and sweat out the vegetables taking care not to let them brown. Once vegetables soften a bit, deglaze with the white wine and reduce by half. Add the thyme and the chicken stock and simmer for 30-40 min or until vegetables are tender. Cut off the heat and add in the cream. Remove the sprigs of thyme and bay leaves. Transfer to a blender or Vitamix and puree in batches and pass through a chinois or other fine meshed sieve. If the soup is too thick add  a bit more chicken stock to your liking. 
One of the beauty of this, or any other well prepared pureed soup for that matter, is that its fantastic on its own, or if your feeling zealous, add some floating accoutrements such as roasted mushrooms and celery leaves, brown buttered dates and parsley leaves, parmesan croutons, toasted pecans, candied bacon, the list goes on. Have fun with it, explore the possibilities. 


Thursday, October 25, 2012

Fermented steak sauce

     The American culture has largely shunned the art and science of fermentation. They have the idea that bacteria is a culprit that needs to be stifled at all cost - thus the over medication, over sanitation, over pasteurization, etc. I am of the opinion that we need to embrace bacteria and let them work for us - after all, the number of bacteria present in the average human outnumbers our number of cells 10 to 1 - which makes us wonder - who's controlling who? Obviously, most of these bacteria are beneficial and most of them are vital for our bodies to function properly. Throughout our evolution bacteria have thrived in our bodies and have perhaps even been the driving force of our own evolution. Scientists have found that bacteria in our stomach, gut, skin, and genitalia, that is largely passed on during birth, is necessary for digestion and defense against other harmful bacteria. Enough of the science lesson but the point is, including beneficial bacteria in your diet via fermented foods is a great way to stay healthy. I try to eat or drink something fermented with every meal - aids in nutrient absorption and keeps your vitality up. The list is huge starting with some obvious ones: yogurt (preferably organic and raw), raw cheese, creme fraiche, real sour kraut, soy sauce, miso, unpasteurized beer cider or wine, kvass, kombucha, real pickles, kim chi, gochujang, umeboshi, fermented salami, etc. The beauty of fermentation is that if you do it right, you can make a big batch and because of the beneficial bacteria/wild yeast, it will keep for a very long time. Now I'm not telling you to roll around in the dirt and never wash your hands - but I am suggesting that you stop taking antibiotics every time you sneeze, drinking pasteurized products, carrying spray-sanitizer in your purse, and being afraid of a little wild fermentation.
      On to the steak sauce. You can go ahead and throw that bottle of A1 in the garbagio because the flavor of this finished sauce is insurmountable. I got the inspiration for this recipe from old boy Chris Hastings - author of Hot and Hot Fish club and owner of the Alabama restaurant with the same name. I strongly suggest that you read the book and/or go to the restaurant if you ever get the chance.

For the sauce:
   2 medium onions chopped
   2 T sesame oil
   3 garlic cloves
   1 large carrot chopped
   1 6 oz container of tomato paste
   1 cayenne pepper
   1 bell pepper
   1 dried ancho chile pepper
   2 T tamarind paste
   4 cloves
   1 tsp  whole allspice
   1 tsp whole peppercorns
   1 whole star anise pod
   10 sprigs of thyme
   3 bay leaves
   1 1/2 cups molasses
   2 cups balsamic vinegar
   2 cups red wine
   3 cups chicken stock
Heat the oil and then add all the ingredients except the last 4. Once the vegetables soften add the remaining 4 ingredients and simmer for 1-2 hours or until the sauce thickens and becomes sticky. Let cool slightly and then puree in a blender and pass through a chinois. Once the sauce has cooled to 80 F add a tbl of whey if you have it - this will inoculate it so to speak with a live culture and keep other harmful bacteria from taking over. Alternatively you can use the pickling brine from other natural pickles or just leave it out and hope for the best. As long as you put it into a clean jar you may be able to get a strong fermentation on its own. Cover tightly with cheese clothe or a paper towel and let sit for 3-5 days. Once the taste as mellowed and matured to where you want it, put a lid on it and put it in the fridge where it will keep almost indefinitely.


Here I took a grass-fed ribeye steak and let it air dry on a rack in the fridge for 2 days until the surface gets shiny and a bit dry. I then dusted some sea salt and cracked pepper on both sides and seared the steak on a hot cast iron pan with a little butter and olive oil until medium rare. The brussels I blanched for 4 min and shocked in an ice bath before searing them flat side down in a hot cast iron pan until browned. Note: I reserved some of the raw brussel leaves when cutting them in half in order to make a raw brussel salad with a little lemon juice and olive oil to go on top. Ladle about a tablespoon of yee olde fermented steak shmigalidoo on top and dig in.

Sometimes I feel like my kitchen is a science lab....in a good way though, its rather comforting to have the bubbling vats of wondafuls around. Stay tuned for my homemade fermented katsup recipe.

Tuesday, October 23, 2012

Roasted Pheasant with Parsnip Puree, Beet Greens, and "Grape Jus"

     Game birds can be hard to find but when you can get them it is a real treat. I  recently found a farm nearby that raises quail, pheasants, and chickens. Unfortunately the flavor of the farmed bird is not the same as the wild caught version and technically they are not game if they are not wild caught. BUT nonetheless they can be very tasty and if you think you dont like overly gamey meat then this could be a good in between for you. Personally I perfer a little gameyness. Pheasants originally come from Africa and are a close relative of the guinea hen. At any rate, many different types of fruit go well with game, typically dried fruit such as figs and wild boar, currants and quail, dried cherries with duck, blueberries and venison, etc. In fact, not to be overly fruity but I've found that you can find a fruit that pairs well with pretty much any type of meat - roasted pears go suprisingly well with steak, brown butter dates with pork, raisins with chicken - try it some time. Here I paired the grapes with the bird but the grapes were a bit tart so I dehydrated them a little in the oven at a low temp overnight to make "graisins"! The result was that the sugars caramelized and got more concentrated in the fruit and the end result was slightly sweeter and still juicy. 


The parsnip puree lends a creamy slightly starchy element to the dish and helps hold some of that delicious sauce. Then the beet greens lend some color and earthyness.
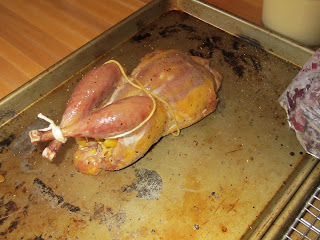
Pheasant does have a tendancy to dry out if not prepared properly so be wary of that. Here I brined the bird   to help it retain moisture and not dry out. Alternatively you could bard the bird by wraping it in bacon, reguardless you want to make sure not to overcook the poor thing and I would suggest serving it a mite pink just to make sure. Pheasants are generally the size of a small chicken and dont have quite as much meat. I'd say one is generally enough to feed two people.

For the Pheasant :
Brine :
   3cups water
   1/4 cup sea salt
   2 T succanat or organic brown sugar
   2 bay leaves
   4 sprigs of thyme
   2 cloves garlic
   ice to bring volume to 5 cups liquid
bring to a boil and simmer for 5 min, then cool with enough ice to bring volume to 5 cups. Brine overnight and then remove bird to a rack and place in the fridge to let the skin dry overnight.  I truss the bird before roasting which entails tying the wings in and the legs together because I think it helps the bird cook more evenly, but this isnt entirely necessary. To roast the bird preheat the oven to 425. Let the bird sit out of the fridge for 20-30 min to come up to temp. Rub the skin with olive oil, sea salt, and fresh cracked pepper. Stuff a few garlic cloves and thyme sprigs in the cavity, then pop it into the hot oven and let it sizzle for 20 min, then turn the oven down to 325 and cook for about another 30 min or until the juices run clear or until the temp reaches 150. Let rest for 20 min and carve.


For the Parsnip Puree:
   3 Large parsnips peeled and chopped
   Milk to cover
Place the parsnips in a sauce pot and barely cover with milk. Cover almost all the way with a lid and simmer until the parsnips are tender. Remove the parsnips to a blender leaving some of the liquid behind. Puree until smooth, you may need to add all of the milk.

For the beet greens
   1/2 lb baby beet greens washed well
   1 t olive oil
   sea salt and cracker pepper to taste
Simply get the olive oil hot and saute the greens until wilted, about 2-3 min.

For the sauce:
   3/4 cups grapes partially dehydrated ( left overnight in the oven at the lowest setting)
   splash of white wine to deglaze the pan the pheasant was cooked in
   brown bits and juices from the pan the pheasant was cooked in
   1 cup chicken stock
   1 T butter
Once the Pheasant is out of the oven you have about 20 min to get together your sauce while the bird is resting. Deglaze the pan with the wine and scrape up to brown bits, then transfer the juices to another pot so its easier to work with. Add the chicken stock and grapes and reduce by half, then whisk in the butter until incorporated and the sauce thickened slightly.


MMM, a nice change-up from the traditional roast chicken with mash potatoes and gravy (which of course is  fantastic in its own right). The grapes plump back up a bit while simmering in the sauce making each one a savory/sweet gusher upon bursting. enjoy.


Thursday, October 18, 2012

Leg O Lamb with Mole and Butternut Squash

        Another Fall dish. Of course this one would be very good during winter as well. I spent the last 2 years in San Francisco where the weather never changed - it was always spring and 50 degrees; no seasons, no snow, no heat, very few leaves changing, very dull. Not that San Fran didnt have its good points, but that was something I really missed about living on the east coast, or as me and my friends like to call it "The Right Side" (not as in right in left but as in right and wrong hah). So, do I like the freezing cold? NO! BUT the changes in mood, visuals, activities, etc bring excitement, variety, and  frame of reference into your life.
         One of my goals here is to give inspiration for everyday dishes at home as well as dishes for special occasions - the goal is of course to always savor the meal and get nourishment from it; and everything I post is healthy for you in one way or another. SO, that being said, the beginner cook OR someone who is used to popping something in a micro-nuclear cooker may see some of these recipes as overly complicated, SO I will try to post a variety of simple AND a little more advanced recipes for everyone and every occasion. However, I will say that in order to make quality, healthy food there needs to be the addition of that secret ingredient L-O-V-E, and that takes time, you have to be willing to spend the time. It will be worth it in the end. Its the difference of cooking a frozen burger in the Nuke and having a well seasoned freshly ground grass-fed beef patty cooked med-rare over fire. The two arent even in the same galaxy! Point is, making good food takes time but with the proper knowledge, tools, and organization it can be simple and fun.
          On to the dish. This dish consist of three simple parts - The Leg of Lamb, which gets marinated and then grilled over wood,


The butternut squash which gets tossed in olive oil and seasonings and then roasted,


And the Mole which is an adaptation of from Hugh Fearnley Whittingstall who, incidentally is one of my favorite food writers of all time. Mole can be made a number of different ways pretty much always includes peppers, nuts, chocolate, and lots of roasty toastiness. I strongly encourage you to check out any of Hugh's River Cottage books as they all are works of art and very informative and inspirational. Mole is a sauce that has a lot of ingredients but the end result is greater than the sum of its parts. As the sauce comes together, the ingredients are hard to pick out individually but all add to the greater good of the whole. 


 On to the Recipe.


For the Leg of Lamb
     One 3-5 lb leg of lamb (I broke down my own lamb and removed the lower part of the leg and shank)
      4 T champagne vinegar
      4 T olive oil
      4 cloves of garlic chopped
      1/2 tsp freshly ground black pepper
      1 tsp salt
      1 tsp sucanat or organic brown sugar
Combine ingredients and rub over lamb. Let sit 4 hrs or overnight. Soak a handful of woodchips for at least 30 min. I used Pecan chips as they go nicely with the nuttiness of the rest of the dish. Prepare the grill (preferable charcoal) to 500. Add the chips and grill the lamb with the lid closed and vent open so the lamb absorbs as much smoke as possible. Turn the lamb every 5-10 min to prevent from burning. After about 15-20 min and a nice dark brown char has occured on all sides, however the heat to 425 and roast an additional 30 min or until the middle has reached 130-135 degrees, remember the leg will continue to cook up about 5 degrees after it is removed from the grill. Let rest for 20-30 min and slice against the grain.

For the Butternut Squash
    3-4 butternut squashes peeled, seeded, and cut into half rings and circles
    2 T olive oil
    2 tsp salt or to taste
    2 tsp freshly ground black pepper or to taste
    1 tsp sucanat or organic brown sugar
    1 tsp paprika
Preheat oven to 425. Toss all ingredients together and spread out on 2 baking sheets making sure not to over crowd. Pop into the oven and roast until browned and tender, about 20 min.

For the Mole
   2 dried ancho chilis
   3 cayenne pepper
   2 red fresno peppers
   1 bell pepper
   1 poblano pepper
   3/4 cup sesame seeds
   1/3 cup cashews
   1/2 cup peanuts
   1/3 cup dried currants
   1/2 tsp coriander seeds
   1 pod star anise
   1/2 cinnamon stick
   1 tsp black pepper corns
   6 cloves  
   3 cloves garlic
   2 small onions chopped
   3 T sesame oil
   2-3 oz dark chocolate (70% or more)
   3-4 cups chicken stock

Rehydrate the dried chilis in boiling water for 20 min. Char the fresh peppers until blistered on all sides and then peel and seed. Toast the spices and nuts until they brown and pop. Add all ingredients except the chocolate, oil and stock into a blender and blend until smooth. Heat the oil in a sauce pot until very hot and pour in the sauce to "toast" it. Simmer for 10 min. When it starts to smell  very fragrant, add in the stock little by little to keep the sauce from thinning too much. Once it is the consistency you want add in the chocolate until just melted. Dont boil the sauce with the chocolate in it. You will have left over Mole but you will not be disappointed. Use it on pork, chicken, turkey, pheasant, etc.
Sauce looks a bit like poop but GEE-WILLAKERS is it divine! ENJOY.

Thursday, October 11, 2012

Autumnal Fair

Ahh the seasonality of food. There are so many dishes and ingredients that really hit the spot during a certain season - the season they're available. And its no accident of course that we've come to associate these foods with the season because thats when they are available. In today, with the advent of globalization, factory farming, and freight shipping, you can get any food at any time of the year, albeit of suspect quality. Ever since the 50s we've gotten away from being restricted to using only whats in season. You can get tomatoes, peppers, and lemons in the winter no problem. I can't say its all bad because I am thankful that I can eat olives, mangos, and grapefruits for instance which don't grow around here, but there is something festive and comforting about creating a dish with seasonal ingredients that really strikes home and goes in tune with the smells, colors, sounds, and activities of autumnal weather. Another plus of cooking with seasonal ingredients is that it can almost guarantee freshness, especially if you get them from a farmers market. I encourage you to start buying direct from farms and/or farmers markets. Not because its hip but because it supports a good cause and its a better product for YOU. Think about it, you want to be able to go to the person direct if you have a problem with your food, and on the flip side if you have special request, you can develop a report with your farmers and they will be more than happy to accommodate. Buying direct also means less shipping and less packaging! Cutting out the middle man means cheaper prices and more information about where the food comes from and how it was raised/grown. If nothing else, going to an open air farmers market is so much more fulfilling an experience than shopping at the grocery store where everything is behind plastic with elevator music in the background and moms yelling at their little Jonny and Jonny crying because he cant get 3 candy-bars and having the workers not know where or what capers are and dealing with the cash register with the attitude chewing bubble gum asking if you want to sign up for such and such a card. whew!

This dish consists of chicken thighs, parsnip, apples, onion, and arugula but with the proper preparation, the sum of the parts meld together to make this a downright delicious, yet simple meal.  I always start with a whole bird (more on that in a later post), this is the deboned legnthigh as I like to call it. Its basically a flattened out piece of dark meat. The elements that make this dish really come to life besides the quality of the products are the fact that I brined the bird making it perfectly seasoned throughout and keeping it from drying out during cooking. In addition, using high heat and getting some nice caramelization on the root vegetables brings out those maillard reactions that taste so delicioso. The third little tid-bit in this dish that makes a huge difference is letting the skin of the bird air dry in the fridge uncovered on a rack for a day or two - this makes the skin cris-up quite nicely.


 Lastly , pretty much any dish benefits from adding a little acid to brighten things up a bit. The two different kinds of vinegar in the arugula garnish are the finishing touch that really brings the flavors together. 

RECIPE
Brine for the Chicken (whole bird jointed into 4 parts)
   3 cups water
   1 1/2 cups apple cider (preferrably unpasteurized)
   4 cloves of garlic crushed
   5 toasted coriander seeds
   3 bay leaves
   5-8 sprigs of fresh thyme or rosemary
   5 allspice berries
   1/4 cup sea salt
   1 tbl sugar
      Bring all ingredients to a boil and then simmer for 5 min. Remove from heat and let cool in fridge. Alternitively, to save some time, you could start with half the water and then after the 5 minute simmer, add ice and the apple cider to bring the total volume of liquid to 4.5 cups. Let the chicken brine for 3 hrs and then wash and pat dry. Place chicken uncovered on a rack with a plate underneath so that air is allowed to flow around the pieces of chicken. Let dry overnight or up to 3 days. The chicken will not go bad in this state, the brine helps preserve it as well as the peticle (dry shiny layer) that is formed on the meat during this drying period. It will actually help keep flavor and moisture in and  bacteria out. As mentioned earlier, this will get the skin of your legnthigh very very crisp when seared properly. To cook the chicken, preheat the oven to 425, heat a tbl of olive oil in a cast iron or stainless skillet until the oil ripples. This indicates that it is hot enough to sear. Make sure to catch it before it smokes, as this will denature the oil. Press the chicken skin side down unto the pan and turn down the heat to medium. Let the chicken cook skin side down for most of the time until it starts to get very brown and crisp (about 5-10 min). If the skin starts to brown too much flip it over and finish in the oven. If you do it right you should be able to finish it in the oven skin side down - the top side will finish cooking from the ambient air in the oven. Let the chicken rest for 5 minutes before diggin in.

While your chicken is cooking have ready
    2 Apples cut into 1 in x 1 in chunks
    1 whole yellow onion cut into 12 chunks
    4 parsnips peeled and sliced into 1 in x 1/4 in pieces
    5 sprigs of thyme
Heat 2 tbl of olive oil in a pan big enough to fit the ingredients without crowding (alternatively do in batches if you dont have a big enough pan to accomodate all the ingredients). When the oil ripples, toss in the medly and when the outsides begin to brown toss in the oven to finish roasting. Remove when nice and brown and tender.

While the medly is roasting and the chicken is cris-up-ing, toss a handful of arugula with a drizzle of walnut oil, sea salt, champagne vinegar, and apple cider vinegar. I made a pan-jus out of chicken stock and raw butter but this is optional as I understand not everyone has those 2 items laying around (but its something to consider...). Serve the chicken thigh over the parsnip, apple, onion medly with the arugula scattered on top and wallow in the fruits of your labor and let your mind drift (alternatively you could talk to the person next to you).


Tuesday, October 2, 2012

WHY COOK?

The purpose of this blog has to be for ME


....because I don’t know if anyone will read it.
 But if they do then it is to inspire. Inspire people to cook, create, and enrich their lives. But why does one cook? For nourishment? Relaxation? Approval? Necessity? Passion? Philanthropy? Fullfillment? Maybe all the above. The fascinating thing about food is that it started as necessity and over the years has evolved into a hobby and an art form. The combinations and techniques are endless and unique to the individual. I like to think of cooking as an adventure - from envisioning the dish, sourcing the ingredients, creating the dish, and partaking of it. In this intensely hectic consumeristic world humans live in today we too often focus on all the wrong issues. Whether its time constraints, intimidation, space issues, money issues, I want to encourage people to return to the kitchen and express their creativity. The most important thing about cooking is that it should be enjoyable and relaxing. My hope is that I can inspire you to try some of my recipes and adapt them to your own tastes and have fun in the kitchen. It is in the art of preparing and eating a well designed meal, by yourself or with comrades, that can bring us back to our roots and take us to a special place of comfort, solace, and communion. To me, cooking and eating are among the most simple yet most profound feelings of pleasure and accomplishment; to share them with others can form some of the greatest bonds.